Below are the steps involved in enabling this feature.
1.The Script below will create a Proxy table and insert three records so that the developer 'shiv' can login(proxy) as 'business_user1' and 'business_user2' and validate the security requirement is as expected.Also the 'Administrator' can proxy the user 'shiv'.
CREATE TABLE OBIEE_ACT_AS_USERS
      (PROXY_ID  VARCHAR2(50),
       TARGET_ID VARCHAR2(50),
       PROXY_LEVEL VARCHAR2(50));
INSERT INTO OBIEE_ACT_AS_USERS(PROXY_ID,TARGET_ID,PROXY_LEVEL) VALUES('Administrator','shiv','full');
INSERT INTO OBIEE_ACT_AS_USERS(PROXY_ID,TARGET_ID,PROXY_LEVEL) VALUES('shiv','business_user1','full');
INSERT INTO OBIEE_ACT_AS_USERS(PROXY_ID,TARGET_ID,PROXY_LEVEL) VALUES('shiv','business_user2','full');
COMMIT;

2.Import the table
OBIEE_ACT_AS_USERS into the Physical Layer and Name the Database and Connection Pool as Act_As_Users , CP_Act_As_Users.
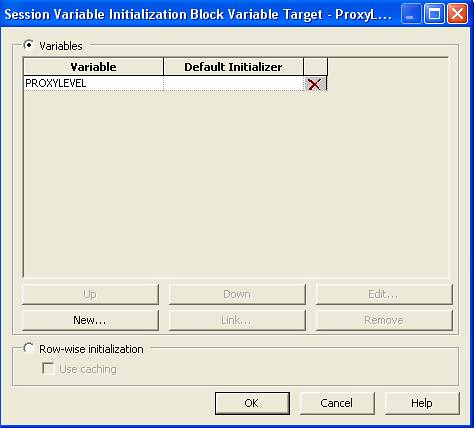
3. We now need to create three Session Initialization Blocks Set_RUNAS(Variable:RUNAS),ProxyLevel(Variable:PROXYLEVEL) and ProxyBlock(Variable:PROXY).
4.Initialization Block:Set_RUNAS
Default Initialization String:
Select 'dummy' from dual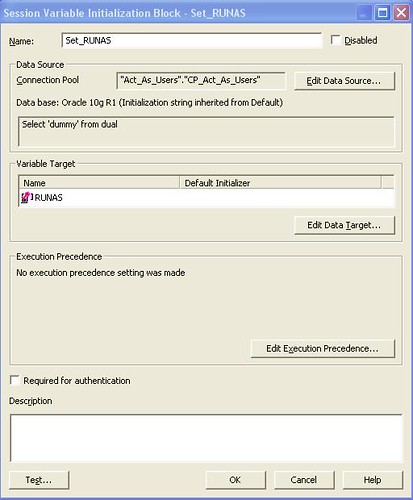

5.Initialization Block:ProxyBlock
Default Initialization String:
Seleselect target_id from obiee_act_as_users where 'VALUEOF(NQ_SESSION.RUNAS)'=target_id and ':USER'=proxy_Id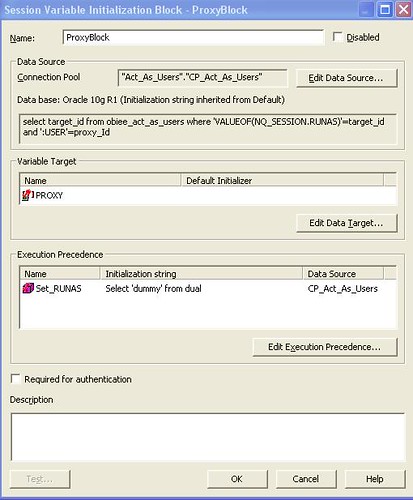
6.Initialization Block:ProxyLevel
Default Initialization String:
select proxy_level from obiee_act_as_users where 'VALUEOF(NQ_SESSION.RUNAS)'=target_id and ':USER'=proxy_Id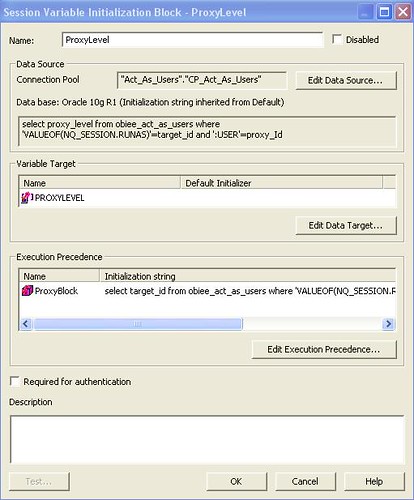
7.Navigate to /OracleBIData/web/config/ and modify the file instanceconfig.xml to add the below tag before the </ServerInstance>
<LogonParam>
<TemplateMessageName>Act_As_Logon_Template</TemplateMessageName>
<MaxValues>100</MaxValues>
</LogonParam>
8.Navigate to /OracleBI/web/msgdb/customMessages/ and create a new XML file Act_As_Logon_Template.xml containing the below script.
<?xml  version="1.0" encoding="utf-8" ?>
<WebMessageTables xmlns:sawm="com.siebel.analytics.web.messageSystem">
<WebMessageTable system="SecurityTemplates" table="Messages">
<WebMessage name="Act_As_Logon_Template">
<XML>
<logonParam name="RUNAS">
<getValues>EXECUTE PHYSICAL CONNECTION POOL Act_As_Users.CP_Act_As_Users select target_Id from OBIEE_ACT_AS_USERS where proxy_Id='@{USERID}'</getValues>
<verifyValue>EXECUTE PHYSICAL CONNECTION POOL Act_As_Users.CP_Act_As_Users select target_Id from OBIEE_ACT_AS_USERS where proxy_Id ='@{USERID}' and target_Id='@{VALUE}'</verifyValue>
<getDelegateUsers>EXECUTE PHYSICAL CONNECTION POOL
Act_As_Users.CP_Act_As_Users select proxy_Id, proxy_Level from OBIEE_ACT_AS_USERS where target_Id ='@{USERID}'</getDelegateUsers>
</logonParam>
</XML>
</WebMessage>
</WebMessageTable>
</WebMessageTables>
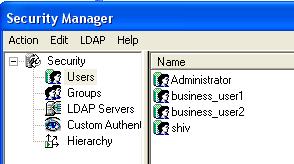
9. Within OBIEE Security add three new Users 'shiv','business_user1' and 'business_user2' as shown below.
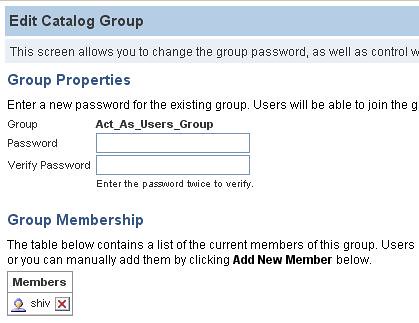
10.Create a new Web group Act_As_Users_Group and add the user 'shiv' to this group.
11.Cotinue to be logged on as an Administrator and Navigate to Settings>Administration>Manage Privileges and add 'Act_As_Users_Group to Proxy .

12. Restart the Oracle BI Server and Oracle BI Presentation Server.
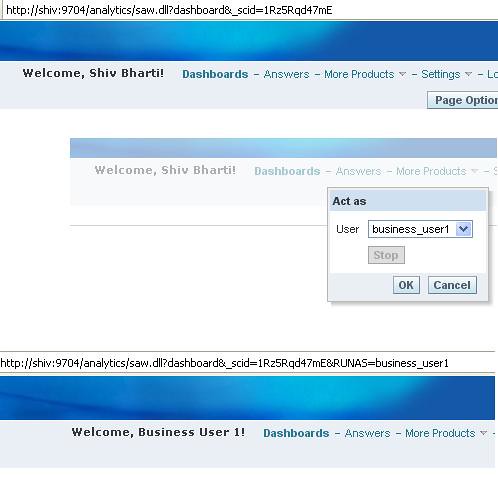
13. Login in as 'shiv' and then navigate to settings>Act as>business_user1
No comments:
Post a Comment