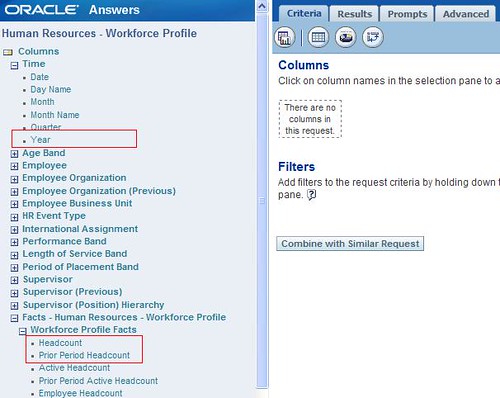
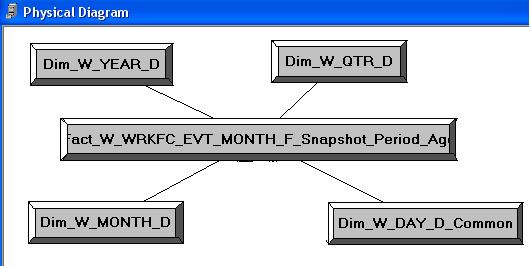
What is Oracle BI Scheduler | |
Oracle BI Scheduler is a service that manages and schedules jobs. Oracle BI Scheduler supports two kinds of jobs:
Scripted jobs.
Scripted jobs are set up and submitted using the Job Manager feature of the Oracle Business
Intelligence Server Administration Tool. For example, a scripted job could periodically load Oracle
BI Server usage statistics into a back-end database. For scripted jobs, Oracle BI Scheduler
communicates with Oracle BI Server.
Oracle BI Scheduler supports two published Java interfaces and two scripting languages.
Supported Java interfaces:
- SchedulerJavaExtension.java
- SchedulerJobInfo.java
Supported script languages:
- VBScript
- Jscript
Unscripted jobs, called iBots.
iBots deliver reports and alerts to end users. iBots are configured and submitted for execution
using Oracle Business Intelligence Delivers. Oracle BI Scheduler communicates with Oracle
Business Intelligence Presentation Services for unscripted jobs.
| | Step 1: Creating Oracle BI Scheduler databases and tables |
![clip_image014[1]](https://blogger.googleusercontent.com/img/b/R29vZ2xl/AVvXsEgihsbSNc3T-IYUM9u48BLnvqV0gX2XYT8wc2qZS4oNp-310Ar7UXsmQDbOyXe3yhDe52LavDoMf7_EoDjszcaWXt2tJBz6aRyvnCAqRDvAsG_vEixPO2haCjtAHm3Ci8_XekLFMENsD4Q/s1600-h/clip_image014%5B1%5D%5B2%5D.jpg "clip_image014[1]")
1) Make sure that you have a valid database administrator account to create a database and tables.
2) Create the database and call it SCHED_TEST_DB
3) Run SAJOBS.MSSQL.SQL /SAJOBS.ORACLE.SQL script to create the necessary tables in the database SCHED_TEST_DB for the scheduler. This script is present at ORACLEBI_HOME\Server\Scripts
4) Verify that S_NQ_ERR_MSG, S_NQ_INSTANCE, S_NQ_JOB, and S_NQ_JOB_PARAM are created.
Please note that separate Databases needs to be created for BI scheduler in QA and production environment.
| | Step 2: Create System DSN for the scheduler database |
Create a new System DSN on the machine where BI Scheduler service is supposed to run.
Oracle database guys can simply give TNS service name as DSN name and hence if they wish can skip this step.
1) From the Windows Start menu, select Settings > Control Panel > Administrative Tools > Data Sources (ODBC).
2) Start the ODBC Data Source Administrator
3) Select the System DSN tab, and then click Add.
4) Select the driver SQL Server, and then click Finish
5) In the wizard Create a New Data Source to SQL Server, do the following
6) Select the appropriate Authentication
7) Make sure check box corresponding to ‘Connect to SQL Server …’ is ticked and click next
8) Check the box corresponding to ‘Select default database’ and select BI Scheduler database created in the step 1. Leave other fields as default.
9) Click next and then finish.
10)Test the connection. The result should be a success.
Please ensure that the default database of the system DSN should not be left blank.
| | Step 3: Configure Job Manager |
![clip_image013[4]](https://blogger.googleusercontent.com/img/b/R29vZ2xl/AVvXsEg4UPM8oFQGwu3-k_GRGSBQSZ2qps1Wv50XOK09V9P9awZpzQ_bWrjok0vzBtH5K_AlhJ5JzwXpdWewyfuvVQIFpfwaknG60bCXdcEeKGNPDuag7o03K29nKi5EZfKjPuaEXXpOKg764E8/s1600-h/clip_image013%5B4%5D%5B2%5D.jpg "clip_image013[4]")
1) From the Windows Start menu, select Programs->Oracle BI Intelligence->Job Manager.
2) Job Manager Window pops up. Fill in the values as shown in the screenshot.

3) Click Scheduler->General tab and Fill in the values as shown in the screen shot below.

Please Note that Administrator Name is the RPD Administrator. Or you can create a new account in the RPD with admin writes.
Type in Administrator Name: Administrator
Administrator Password: xxxxx
4) Click on Mail->General Tab and fill in the values as shown in the screenshot below. Display Name can be changed to whatever seems to be appropriate.

5) For rest of the fields, leave them to their default values and click OK.
| | Step 4: Configure instanceconfig.xml |
![clip_image013[5]](https://blogger.googleusercontent.com/img/b/R29vZ2xl/AVvXsEjqIMBoCxN2SGsuruZSXPDjJpCJ17utu5-TvT-RakbAzNwz2q6Bu6cDEEd7vGolLNsIwMkDJ2vamwniKNNEztU0MHHkR-qVMsRO_AI3lINuuhfSCvFIJFH6CPPhF60vnDRQOY08hFfGYA8/s1600-h/clip_image013%5B5%5D%5B2%5D.jpg "clip_image013[5]")
1) Open the instanceconfig.xml file for editing from OracleBIData_HOME/web/config
2) Between the <ServerInstance></ServerInstance> tags, locate the tag pair <Alerts> and </Alerts>. (If they do not exist, create them.)
3) Between the Alerts tags, create the tag pair <ScheduleServer> and </ScheduleServer>.
4) Between the ScheduleServer tags, insert the machine name of the Scheduler machine. Please see the screen shot below
5) Save the file when you are done.

Your changes take effect when the Oracle BI Presentation Services service is restarted.
| | Step 5: Configure credentialstore.xml |
![clip_image013[6]](https://blogger.googleusercontent.com/img/b/R29vZ2xl/AVvXsEgZbbtR63weQTi65AyK_jBO-a5xKak6x_LfaahfZzC8GDuQufX6f4PH82aZ2EVbZAS3QD5hRGu418eyduvnZO_lvfEdz_EAV6qsQWOgb_V2ktvwRhwzOqbPDX-d55nHMMyeTXW29ExzyHQ/s1600-h/clip_image013%5B6%5D%5B2%5D.jpg "clip_image013[6]")
Open command prompt (Press Windows+R and type in cmd)
i) Run the following command.
cryptotools credstore -add –infile OracleBIData/web/configcredentialstore.xml
ii)>Credential Alias: admin
iii)>Username: Administrator
iv)>Password: DTADMIN
v)>Do you want to encrypt the password? y/n (y):
vi)>Passphrase for encryption: secret
vii)>Do you want to write the passphrase to the xml? y/n (y):
viii)>File "OracleBIData_HOME/web/config/credentialstore.xml" exists. Do you want to overwrite it? y/n (y)
Please note that Credential Alias must always be ‘admin’. BI Presentation service identifies BI Scheduler service using this alias.
| | Step 6: Reconfigure instanceconfig.xml |
![clip_image013[7]](https://blogger.googleusercontent.com/img/b/R29vZ2xl/AVvXsEiK38R4eUVAvlDMP9E-jF3-ZlpoPRbu7MwppcT_D4joQ2ARUdzJBJqklM-6Qszo0pyJlpJf1rLeKKoHCbEDSWaWdUJzB-GfmgKEiGIhFvY-uh-U3b4WQTPmG4sQkypVk4lkFzoNhwmpPMg/s1600-h/clip_image013%5B7%5D%5B2%5D.jpg "clip_image013[7]")
The reconfiguration of instance config is done to identify the credentialstore.xml.
1) Open the instanceconfig.xml file for editing.
2) Locate the <CredentialStore> node within this file
3) If the <CredentialStore> node does not exist, create this element with sub-elements and attributes. See the screenshot below.

4) Restart Presentation Services to reflect the configuration changes.
| | Step 7: Start BI Scheduler Service |
![clip_image013[8]](https://blogger.googleusercontent.com/img/b/R29vZ2xl/AVvXsEh3ieiKVo4c0xZcgbkiWPQiosoDJKIa3fr-hqwQeMMZX10ttaO3RUBsVL-ePn93qOfI62tDr6ibfzZEpZl1tzFq1bloFIy8U1iNWuU7c1Z5pwz4ZGeEjKdoHX750ev6zcx0Tm0udUJFgd8/s1600-h/clip_image013%5B8%5D%5B2%5D.jpg "clip_image013[8]")
1) Restart Oracle BI Server,
2) Restart Oracle BI Presentation Server
3) Restart Oracle BI Scheduler Service.
| | Step 8: Test the setup |
![clip_image013[9]](https://blogger.googleusercontent.com/img/b/R29vZ2xl/AVvXsEiMRQ_c0vy1Ktbz35bU0NUc1c5FqtWkhKfrYox34hUjdlexXERaA7Xd_YOegqUadVc55yKsR9YdRx830XjDNJMHmN4QkW_GtR0fkZCMA1K38kodm7Z51jIJWO0mc7EO1SvWZu6zE_FQxcA/s1600-h/clip_image013%5B9%5D%5B2%5D.jpg "clip_image013[9]")
To test the setup, create a very simple iBOT and see whether it works.
Procedure to create a simple iBOT.
1) Log into BI Presentation Analytics homepage using Administrator account
2) Go to ‘Settings’ on the top right corner and then go to ‘My Account’.

3) ‘My Account’ window pops up. Click on Add Email Device.

4) Add Email Device as shown in the screenshot below and then click finish.
5) Click on Add Delivery profile and then add Delivery profile as shown in the screenshot.

6) Again to ‘Settings’-> Administration->Manage Privileges.
7) Check for the privileges for ‘Delivers’. Ensure that privileges are awarded as shown or according to the business needs

8) Click on ‘More Products’ and then click on ‘Delivers’

9) Click on ‘Create iBot’ and select the ‘Recipients’ Tab

10) Check ‘Me’ box and add more recipients if you want to.

11) Select ‘Delivery Content’ and select a report from ‘select content’ tab.
12) Give headline in Headline text box. This would appear as Subject line for the email.

13) Go to ‘Destination’ Tab and check Email box.

14) Go to ‘Schedule’ Tab and check start immediately.

15) Save the iBot.

After a couple of Minutes if the setup is configured correctly, you should get the alert on email. If you get an email, this implies that BI Scheduler has been setup correctly.
| | References |
![clip_image013[11]](https://blogger.googleusercontent.com/img/b/R29vZ2xl/AVvXsEgIuB5ilmx01kTeD3ovYyUlKOEywynkNJufs7iHCCwkb376qFY-3WjDTBD1li2GrncfvZmYVNdWk6VL0hhmE4w4CXyADlRZ4cPr0mKdeFexMcJCFjHk3_PkqP2ahsKrsney7-Ay4tA1PGo/s1600-h/clip_image013%5B11%5D%5B2%5D.jpg "clip_image013[11]")
1)
Oracle® Business Intelligence Infrastructure Installation and Configuration Guide
Version 10.1.3.2.1
April 2007
2)
Oracle® Business Intelligence Scheduler Guide
Version 10.1.3.2
December 2006